Media Summary: How to take a graphic and put it into the Thanks to for the boards - we'll soon be ordering a lot more! The ESP32 Rainbow is ... How to change the outline for your footprint from the

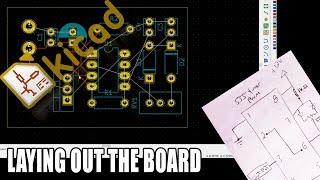
Kicad Tutorial 3 Silk Screen - Detailed Analysis & Overview

How to take a graphic and put it into the Thanks to for the boards - we'll soon be ordering a lot more! The ESP32 Rainbow is ... How to change the outline for your footprint from the This is the final video in a three part series on Purchase my new book: Arm Microcontroller Programming and Circuit Building Volume 1 This video was ... Join this channel to get access to perks: Order your High ...

Photo Gallery

KiCad Tutorial #3 Silk-screen and copper pour.
KiCad 3.0 - Adding Silkscreen And Graphics To Your PCB In KiCad
KiCad 3.0 - Creating Custom Silkscreen Graphics In KiCad
KiCAD For Beginners 3 - Laying Out The Board
Taking KiCad Silk Screen to the Next Level!
KiCad 3.0 - Changing The Footprint Outline Layer In KiCad
KiCad 9.0 – Getting started Part 3: Create a Custom Schematic Symbol | DigiKey
How To Use KiCad to Make a Printed Circuit Board: Part 3
KiCAD PCB Design for Beginners Using Application Notes for STM32 and FT232 #KiCAD #pcbdesign
KiCAD Tutorial #11: Footprint Design
KiCAD in 3 Minutes
KiCad 8 - First project step 12: Silkscreen text and graphics
View Detailed Profile
KiCad Tutorial #3 Silk-screen and copper pour.

KiCad Tutorial #3 Silk-screen and copper pour.

KiCad tutorial

KiCad 3.0 - Adding Silkscreen And Graphics To Your PCB In KiCad

KiCad 3.0 - Adding Silkscreen And Graphics To Your PCB In KiCad

How to import images to

KiCad 3.0 - Creating Custom Silkscreen Graphics In KiCad

KiCad 3.0 - Creating Custom Silkscreen Graphics In KiCad

How to take a graphic and put it into the

KiCAD For Beginners 3 - Laying Out The Board

KiCAD For Beginners 3 - Laying Out The Board

This is the third video in my

Taking KiCad Silk Screen to the Next Level!

Taking KiCad Silk Screen to the Next Level!

Thanks to https://www.PCBWay.com/?from=atomic for the boards - we'll soon be ordering a lot more! The ESP32 Rainbow is ...

KiCad 3.0 - Changing The Footprint Outline Layer In KiCad

KiCad 3.0 - Changing The Footprint Outline Layer In KiCad

How to change the outline for your footprint from the

KiCad 9.0 – Getting started Part 3: Create a Custom Schematic Symbol | DigiKey

KiCad 9.0 – Getting started Part 3: Create a Custom Schematic Symbol | DigiKey

In Episode

How To Use KiCad to Make a Printed Circuit Board: Part 3

How To Use KiCad to Make a Printed Circuit Board: Part 3

This is the final video in a three part series on

KiCAD PCB Design for Beginners Using Application Notes for STM32 and FT232 #KiCAD #pcbdesign

KiCAD PCB Design for Beginners Using Application Notes for STM32 and FT232 #KiCAD #pcbdesign

Purchase my new book: Arm Microcontroller Programming and Circuit Building Volume 1 https://amzn.to/3LFRaU5 This video was ...

KiCAD Tutorial #11: Footprint Design

KiCAD Tutorial #11: Footprint Design

Join this channel to get access to perks: https://www.youtube.com/channel/UCKUJpbfZ5M4WeHr0kd8WAgQ/join Order your High ...

KiCAD in 3 Minutes

KiCAD in 3 Minutes

Here's a complete

KiCad 8 - First project step 12: Silkscreen text and graphics

KiCad 8 - First project step 12: Silkscreen text and graphics

This video is part of my “

How to Add Image or Logo on PCB in KiCad | Step-by-Step KiCad Tutorial Part 2

How to Add Image or Logo on PCB in KiCad | Step-by-Step KiCad Tutorial Part 2

How to Add Image or Logo on PCB in